So... HomeLab-2? What is that?
18 October 2023 (homelab programming retrochallenge retrochallenge2023 retro javascript idris)I don't blame you if you don't know what a HomeLab-2 is. Up until I listened to this podcast episode, I didn't either. And there's not much info online in English since it never made it out of Hungary.
As interesting as the history of this "Soviet bloc Homebrew Computer Club" machine is, I will be skipping that here and concentrate on the technical aspects.
Basic architecture
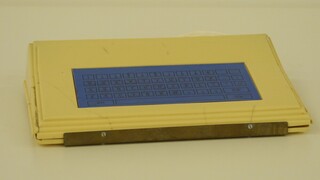
HomeLab-2 is a home computer in the eighties sense: a computer that boots to a BASIC interpreter, with a built-in keyboard, video output that can be connected to a TV.

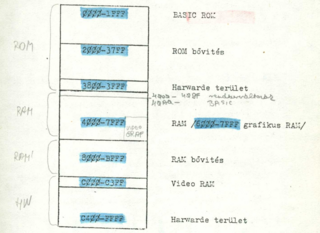
The core of the machine is the well-known Zilog Z80 CPU, one of the stars of this class of computers (the other one being, of course, the MOS 6502). It is connected to 8 KB of ROM containing the BASIC interpreter, some IO routines for thing like loading programs from cassettes, and a rudimentary monitor. The system also comes with 16 KB of general purpose RAM (upgradeable to 32 KB), and 1 KB of text-mode video RAM coupled with a 2 KB character set ROM that is inaccessible to the CPU.
One interesting aspect of the machine is that due to export restrictions and a weak currency, availability of more specialised ICs was limited, and so the HomeLab-2 was designed around this limitation by only using 7400-series ICs beside the Z80. This meant that a lot of the functionality that you would expect to be done with custom circuitry, chief among them the video signal generation, was done by the CPU bit-banging the appropriate IO lines. This is somewhat similar to the ZX80/81 video generator, in that the CPU "jumps" to video memory so that its program counter can be used as the fastest-possible-updating software counter, and the supporting circuitry makes sure the CPU's data lines are fed NOPs. Concretely, the value appearing on the data bus is 0x3F, which is effectively a NOP (it inverts the carry flag) and makes it easy to conditionally change it to a 0xFF, i.e. a RST 38, which is used to mark end-of-(visible)-line.
To program the HomeLab-2, you don't need to know the exact details of this, but it is important to keep in mind that as long as the video system is turned on, the CPU will spend 80+% of its time drawing the screen, leaving your program with less than 20% of its 4 MHz speed.
Data storage is done to cassette tape, via an audio mic/speaker port. Writing to a specific memory location sets the audio output into its high level for about 10 μs. The on-tape format is based on simple 10 μs-wide square waves 1.6 ms apart: for high bits, this interval is halved by an extra mid-point square. Of course, for the CPU to be able to accurately keep track of the audio signal timing, the video system has to be turned off while accessing the tape.
The audio output is also routed to an internal speaker so you can generate sound by modulating this 10 μs square.
The emulation sitch
To get started with HomeLab-2 development, we need some way of testing programs. A straightforward tool of doing that is an emulator of the machine. Unfortunately, at least back in August when I started working on my games, the emulator situation wasn't quite rosy.
The obvious place to check first is MAME, and indeed it claims to support the HomeLab-2. However, it was obviously written as a quick hack by someone who didn't really invest the time into understanding how the original machine's video system worked. This of course wreaks havoc with the timings, and makes it impossible to get cassette IO working.
Discounting very old emulators running on DOS, the other one I found was Attila Grósz's emulator of the whole HomeLab family, which had an update as recently as May 2022, but its HomeLab-2 support was quite limited. And much more annoyingly, it's a Windows-only closed source software. I don't want to dunk on the guy, but that's just stupid; especially because looking at the source of actual working emulators is usually a really good way in resolving any ambiguities in documentation during development. And realistically, what benefit can you possibly hope from your closed-source emulator of a computer that in our Lord's year of 2023 probably interests about a dozen people?!
So I did what any responsible adult would do when faced with a limited-time game jam where he has to also learn Z80 assembly and figure out, well, everything: I set out to put all that aside and cobble together my own emulator. With blackjack and hookers, of course.

My first emulator
Oops I guess the section title is a spoiler.
I wanted to make something that people can just use without any fuss, so I decided to target web browsers and make it into a single-page app. The goal was to quickly get something off the ground, publish it so that others can also use it for the game jam, and then later hope for contributions from people who know the machine better.
Because I was in peak "just get the damn thing working" mode, I decided to write vanilla JavaScript instead of transpiling from some statically typed functional language, which is what I would normally do. With JavaScript, at least I knew that whatever happens, the code might end up as a horrible mess of spaghetti but at least I won't run into situations where I'm "the first guy to try doing that" and everything breaks, which is usually how it goes with these projects of mine.
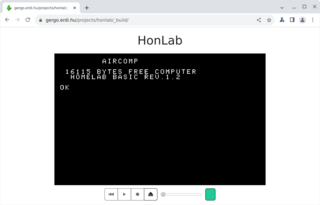
For the CPU core itself, I found an easy-to use Z80 emulator library. I connected it to some array-backed ROM and RAM, started rendering the text video RAM onto a canvas, and let the firmware rip. This got me all the way to the BASIC prompt, not bad for a couple minutes of hacking:

Getting from this to actually blinking the cursor and accepting input was much trickier, however. Remember all that detail a couple paragraphs ago about how the video system is implemented, what fake read values appear on the data bus as the video memory is scanned, that sort of stuff? That was not documented at all. The users' manual only mentions that the NMI "can't be used" for user purposes because it is used by the video system. I pieced the rest together mostly from reading the firmware disassembly, observing the CPU's behaviour, looking at the schematics, and doing a lot of "now if I were designing this machine, how would I do things?".
Eventually I got enough working that text-mode video worked; and then I gave up on raster video because I knew I wouldn't need it for the kinds of games I was envisioning. Then I added cassette IO, which necessitated a cassette player UI which then became way too much, and I kind of lost steam. But hey, at least I lost steam after I've got everything working. Well, everything except sound and raster graphics. But definitely everything that I was planning to use for my games!
This emulator, named HonLab (because HomeLab, and it runs on a web page, and honlap is Hungarian for home page, ha ha very clever, get it?! yeah sometimes I crack myself up!) can be used online here and its source code is on GitHub here.

Now, at this point, the game jam deadline was rapidly approaching, and I still haven't written a single line of Z80 assembly, so it was time to finally...
Writing a second emulator
Oh my god what is wrong with me.
Also, this blogpost is starting to take too long to write, so long story short: based on my previous good experience with Idris 2's JavaScript backend and also itching to use Stefan Höck's new SPA FRP library, I decided to write a new version from scratch (only reusing the Z80 core), but this time in Idris 2. It's almost as finished as the first version, just missing the ability to save to tape; you can look at its source here and it was exactly the kind of project that I initially wanted to avoid: one where a significant amount of my time went into reporting upstream bugs and even fixing some. Time enjoyed wasting, and all that.
Also, because the two emulators do look the same from the outside, I won't bother making another screenshot; you wouldn't notice it anyway.

So by the next post, we'll finally get to the beginning of September, when I started writing Actual Lines of Code.

